This section discusses components of the text editor and formatting content using the text editor.

The text editor allows users to format information on a page within a piece of content, most frequently Page Content. Page Content is the most commonly used piece of content in TerminalFour, and in this content type, the text editor can be found next to the heading "Main Body."

The text editor includes a menu and a toolbar of options, similar to those found in Microsoft Office applications.

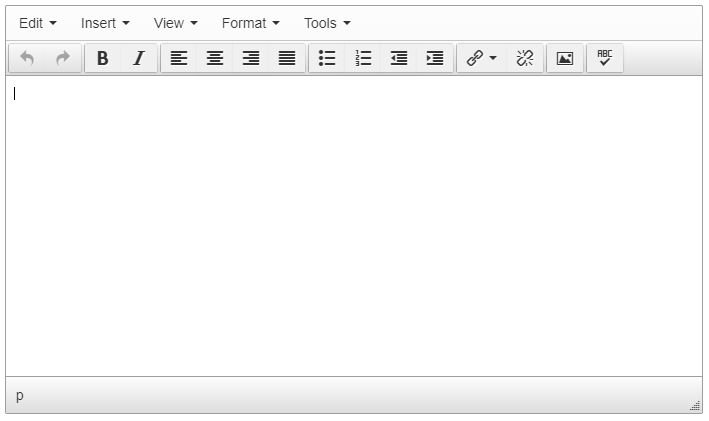
Text editor menu and toolbar

The text editor has a menu and toolbar that allows users to make changes to how content appears.

The text editor has five menu options (Edit, Insert, View, Format and Tools), as well as 16 toolbar options, above a box where users can add text, links or media (images/files).

Edit menu

The Edit menu in the text editor menu includes options to Undo, Redo, Cut, Copy, Paste, Paste as text, Select all and Find and replace.

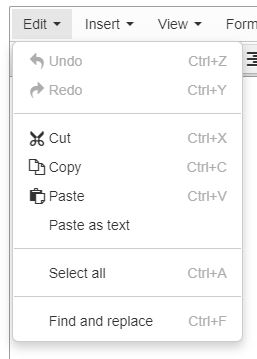
From the Edit menu, you can do the following actions, all of which function the same way as these actions do in Microsoft Word:

  • Undo (Ctrl+Z)
  • Redo (Ctrl+Y)
  • Cut (Ctrl+X)
  • Copy (Ctrl+C)
  • Paste (Ctrl+V)
  • Paste as text
  • Select all (Ctrl+A)
  • Find and replace (Ctrl+F)

These keyboard shortcuts are the same as Microsoft Office's keyboard shortcuts.

Paste as text

Before pasting text into the text editor, you must select "Paste as text." This will remove any formatting and extra code that can negatively alter how text appears on the website. If you do not paste as text, it could cause an accessibility failure.

Insert menu

The Insert Menu in the text editor includes one first-level action to Insert link and a submenu of actions: Insert section link, Insert content link, Insert/edit external link and Insert anchor.

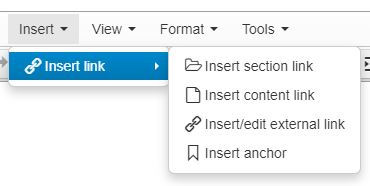
The Insert menu allows you to add different types of links using "Insert link" and includes the following actions:

  • Insert section link
  • Insert content link
  • Insert/edit external link
  • Insert anchor

Read detailed instructions on adding links.

View menu

The View menu has options to toggle Visual aids (for invisible elements) and enter Fullscreen mode.

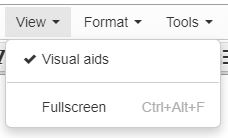
This menu includes options to toggle:

  • Visual aids: This preselected option shows invisible elements in T4.
  • Fullscreen

Format menu

The Format menu of the text editor has 6 actions (Bold, Italic, Strikethrough, Superscript, Subscript and Clear formatting) and one submenu (Formats), which includes submenus: Headings, Inline, Blocks, Alignment and options for additional formats.

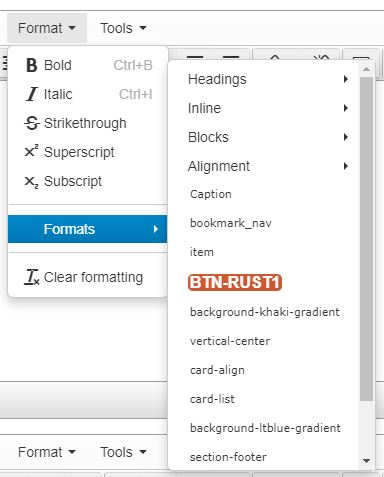
This menu allows you to format text using the following options:

  • Bold
  • Italic
  • Strikethrough
  • Superscript
  • Subscript
  • Formats
  • Clear formatting

These options operate the same as they do in Microsoft Office.

Formats

Formats include the following:

  • Headings
    • Heading 2
    • Heading 3
    • Heading 4
    • Heading 5
    • Heading 6
  • Inline
    • Bold
    • Italic
    • Strikethrough
    • Superscript
    • Subscript
  • Blocks
    • Paragraph
    • Blockquote
    • Div
    • pre
  • Alignment
    • Left
    • Center
    • Right
    • Justify
  • Caption
  • bookmark_nav
  • item
  • BTN-RUST1
  • background-khaki-gradient
  • vertical-center
  • card-align
  • card-list
  • background-ltblue-gradient
  • section-footer
  • email
  • phone

Tools menu

The Text Editor's Tools menu has two options: Spellcheck (to check spelling) and  Source code (to inspect the HTML of a piece of content).

This menu includes:

  • Spellcheck: Run a spelling check on the contents of the text editor (does not check the whole page)
  • <> Source code: Inspect and edit the HTML in the text editor

Toolbar

 TerminalFour's text editor toolbar includes the following buttons, from left to right: Undo, Redo, Bold, Italics, Left-align, Center-align, Right-align and Justify, Bulleted list, Numbered list, Decrease Indent, Increase Indent, Insert Link, Remove Link, Insert from Media and Spell-check.

TerminalFour's text editor toolbar includes the following buttons, from left to right: Undo, Redo, Bold, Italics, Left-align, Center-align, Right-align and Justify, Bullet list, Numbered list, Decrease Indent, Increase Indent, Insert Link, Remove Link, Insert from Media and Spellcheck.

Headings

Use headings to indicate a new topic on a webpage. Heading 1 is the page's section title; this is set by a user when creating the section.

TerminalFour users have access to five heading levels, from highest to lowest level: Heading 2, Heading 3, Heading 4, Heading 5, Heading 6.

Headings, like heading 1 through heading 6 shown in order here, must appear in hierarchical order

To comply with heading accessibility requirements, headings must follow an outline format. Start with Heading 2 and work your way down. For example:

  • Heading 2: Admissions (main topic 1)
    • Heading 3: Requirements (subtopic 1 of main topic 1)
      • Heading 4: Prerequisites (subtopic of subtopic 1)
    • Heading 3: International Student Requirements (subtopic 2 of main topic 1)
  • Heading 2: Application Process (main topic 2)
    • Heading 3: Application Deadline (subtopic 2 of main topic 2)

Note: To meet accessibility requirements, headings cannot be used in place of bold.

In the text editor, select the text you wish to make a heading. This text must be in a separate paragraph from paragraph text, as it will format anything within the same paragraph. Open the Format menu, hover over Formats to open a submenu, and hover over Headings to open a submenu of heading options (Heading 2 to Heading 6). From this list, select the appropriate heading.

Under the Format menu in the text editor, hover over Formats to open a submenu and hover over Headings to open a submenu of heading options (Heading 2 to Heading 6), then select the appropriate heading.

Links

Highlight the text you want to link, then go to the menu ("Insert > Insert Link") or the toolbar ("Insert Link") to select what type of link you would like to add.

Internal link

Link to an internal webpage

Select "Insert section link" to send users to an existing page in TerminalFour.

The Insert Menu in the text editor includes one first-level action to Insert link and a submenu of actions: Insert section link, Insert content link, Insert/edit external link and Insert anchor.


A window will pop open where you can select the existing section you'd like to link to using the site structure. Select the section, and the text you've highlighted will appear blue to indicate it has been linked.

Link to a specific piece of content

Select "Insert content link" to send users to a specific piece of content in an existing section.

A window will pop up where you can select the existing section where the content lives. Select the section where the content lives. The section's pieces of content will appear in the window. Select the piece of content you'd like to link to, and the text you've highlighted will appear blue to indicate it has been linked.

External link

Select "Insert/edit external link" to add a link to an outside webpage (not an evms.edu webpage). Paste or type the link into the "Url" field.

The text to display field shows the text you've highlighted to be linked.

For the target field, select "New window." This will allow the link to open in a new window.